
Setup guide
Install Twilio SMS + Workflows, connect Twilio, and send your first text from HubSpot. Every step, with screenshots — no technical knowledge needed.
Last updated August 11, 2026
This guide takes you from "I just found this app" to "my HubSpot is sending and receiving text messages." It assumes no technical knowledge. Every step tells you what to click, what you should see afterwards, and what to do if you see something else instead.
Set aside about fifteen minutes. You can stop after any step and come back later — nothing is lost.
Watch it instead
Everything on this page, done once on camera — install, Twilio, a phone number, a text sent from a contact record, and a workflow that sends one on its own. Nine minutes. The written steps below cover the same ground if you'd rather read, or want something to follow along with.
What this app does
Twilio SMS + Workflows connects a Twilio account you already own to your HubSpot account, so text messages behave like any other HubSpot channel.
Once it's set up you can:
- Text people automatically from a workflow. Appointment reminders the morning of a meeting, a follow-up after a no-show, a review request when a deal closes.
- Reply to incoming texts from your shared inbox. A customer texts your business number, it opens as a conversation in HubSpot, and whoever is on duty replies — no phone passed around the office.
- Send a one-off text from a contact record. You're looking at someone's record, you need to reach them now, you type a message and send it without leaving the page.
Every message to or from someone in your CRM is written to that contact's timeline. Six months from now you can open a contact and read the whole conversation.
Pepperwire never resells text messages. You sign up with Twilio directly, you buy your phone numbers from them, and they bill you for the messages you send. Our subscription covers the integration — the part that makes Twilio and HubSpot talk to each other.
Before you start
Three things need to be true before setup will work end to end.
1. Your HubSpot plan. Different features need different HubSpot plans. This is HubSpot's rule, not ours, and it's worth checking now rather than halfway through.
| What you want to do | HubSpot plan you need |
|---|---|
| Text from a contact record | Any paid plan |
| Send SMS from a workflow | A Professional or Enterprise hub with workflows |
| Incoming texts in the shared Inbox or Help Desk | Sales Hub or Service Hub Professional or Enterprise |
If you're not sure what you have, in HubSpot click the settings gear, then Account Management → Account Defaults, and look at the subscription listed there.
2. A Twilio account with a phone number. If you don't have one, create a free Twilio account. Twilio gives new accounts trial credit, and a US local number costs about $1.15 a month. You need a number that can send SMS — most can, but toll-free and some international numbers behave differently.
3. If you're texting US phone numbers: A2P 10DLC registration. US carriers block business text messages sent from unregistered numbers. Not delay — block. Registration is free, takes about fifteen minutes to submit, and roughly one to two weeks to be approved, so it's worth starting early. Our A2P 10DLC guide walks through it.
While you wait for A2P approval, you can still prove the setup works. A Twilio trial account can text any number you've verified with Twilio, and Twilio's built-in Virtual Phone works in both directions with no carrier rules at all. There's more on this in Send a test text.
Install the app
Start from the app's page in the HubSpot App Marketplace and click Install app.
HubSpot asks which account you want to install into. If you manage more than one HubSpot account, pick carefully — the app connects to exactly the one you choose here.
Next comes the permissions screen. HubSpot lists everything the app is asking to do, and you click Connect app to approve.
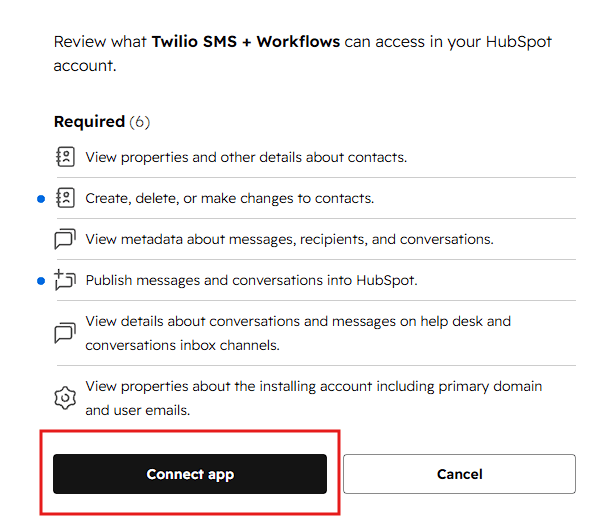
Here's what each permission is for, in plain terms:
| Permission | Why we ask for it |
|---|---|
| Read contacts | To find the right person when a text arrives, and to read the phone number a workflow should text |
| Write contacts | To write each message onto the contact's timeline. HubSpot's API for logging a text on a record sits behind this permission — it's the only thing we use it for, and we never create or edit a contact |
| Read conversations | To list your inboxes so you can choose where texts should land |
| Read and write custom channels | To put incoming texts into your inbox and send your replies back out |
We don't ask for anything beyond these. We can't see your deals, your emails, your reports, or your files.
After you approve, HubSpot sends you to the Pepperwire dashboard and your 7-day free trial starts. No card is needed to start the trial.
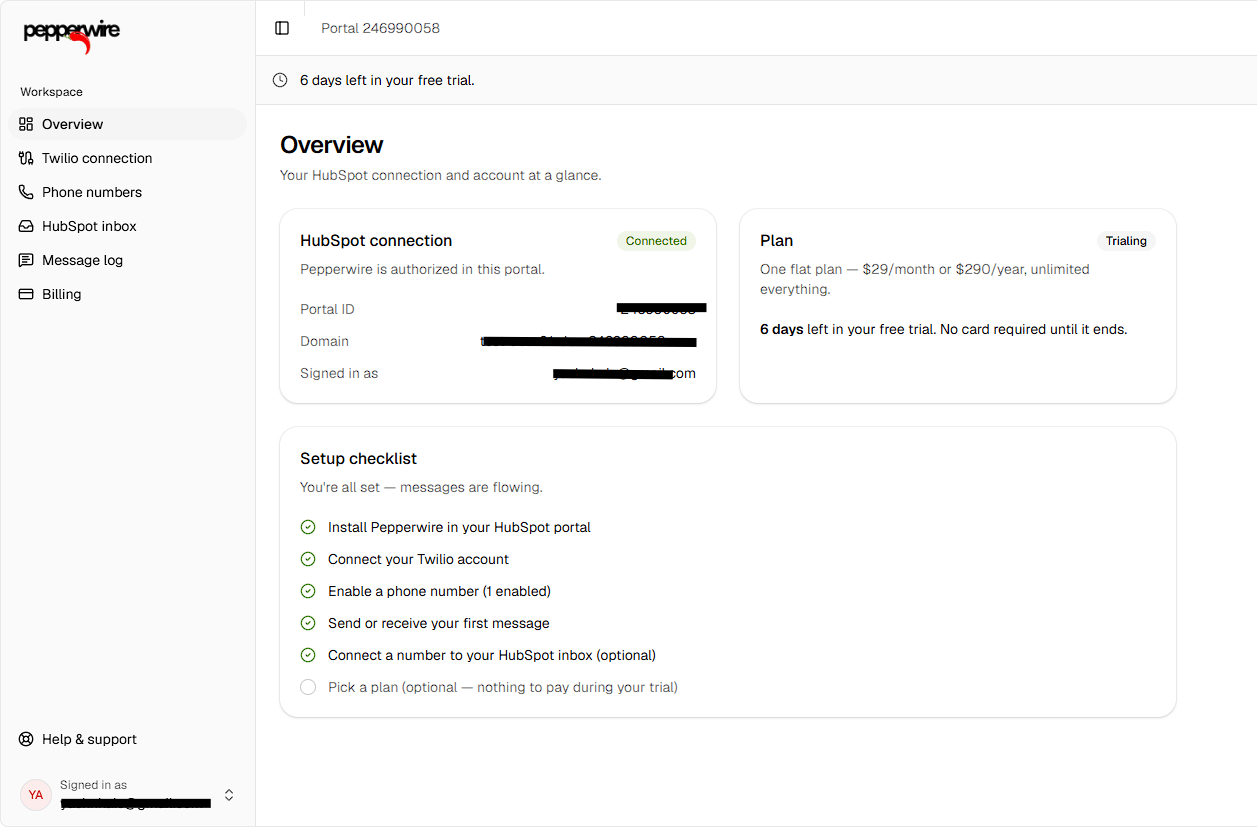
The checklist on that page is the same sequence as this guide, and it ticks itself off as you go.
The dashboard lives at pepperwire.app. Click Log in and choose Continue with HubSpot — the same HubSpot login you already use. There is no separate Pepperwire password to remember.
Connect your Twilio account
Pepperwire needs permission to send and receive messages on your Twilio account. You give it that with an API key — a credential you create for this purpose and can revoke at any time. We deliberately never ask for your Twilio Auth Token, which is the master password to your whole Twilio account.
You'll copy three values across. Open console.twilio.com in a second browser tab so you can flip between the two.
Find your Account SID. It's on the Twilio Console home page, in the
Account Info panel. It's a long string starting with AC. Copy it.
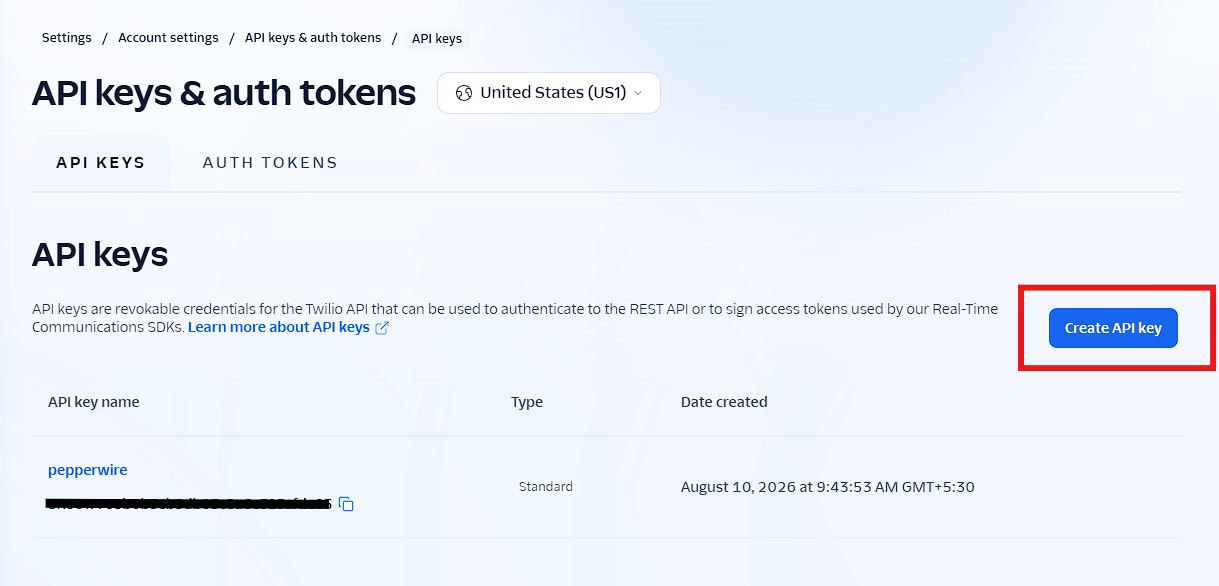
Create an API key. In the Twilio Console, go to Account → API keys & tokens, then click Create API key. Name it something you'll recognise later, like "Pepperwire". Leave the key type set to Standard — a Restricted key won't have the permissions we need, and setup will fail with an authentication error.
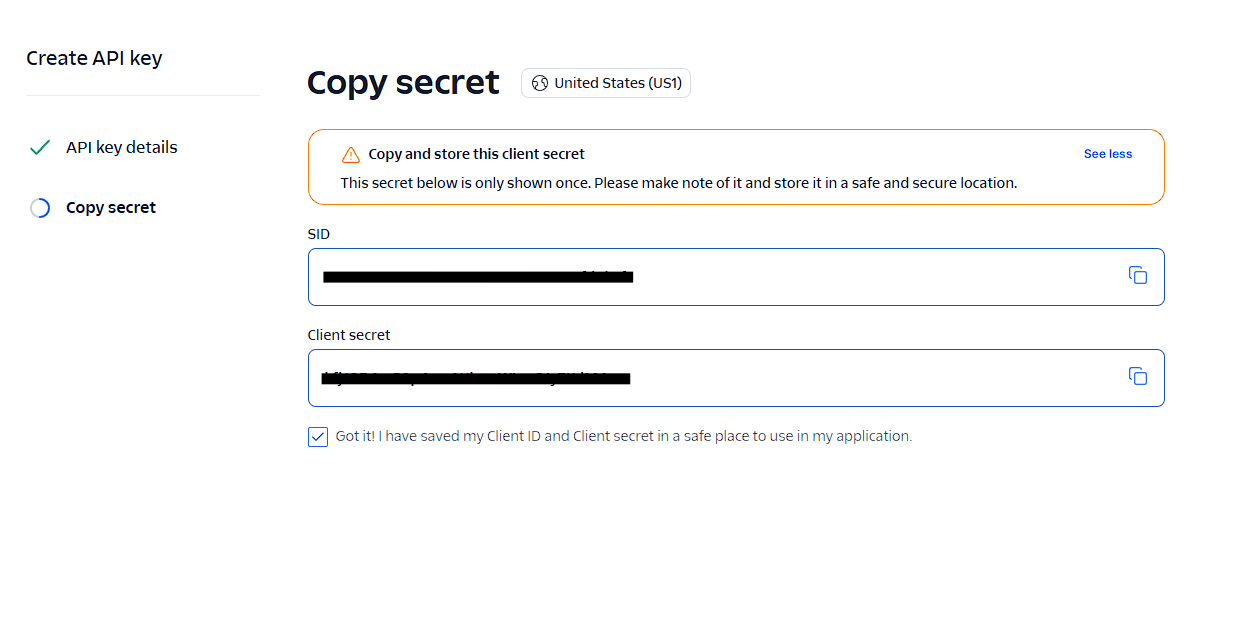
Copy the SID and the Secret. Twilio now shows you two values: a SID
starting with SK, and a Secret.
Twilio will never show you that Secret again. Copy it somewhere safe before you leave the page. If you lose it, no harm done — delete the key and create a new one.
Paste all three into Pepperwire. Back in the Pepperwire dashboard, go to Twilio and paste the Account SID, the API key SID, and the Secret.
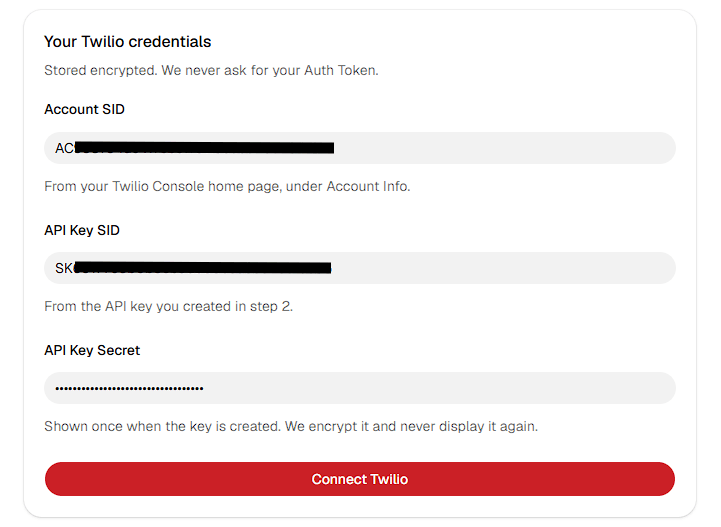
Click Connect. We check the values with Twilio before saving them, so a typo is caught immediately rather than showing up as a mysterious failure later. When it works, the page shows your Twilio account name with a green Connected badge.
Your API key Secret is encrypted before it's stored, and it's never shown back to you or to anyone else.
Turn on a phone number
Go to Phone numbers in the Pepperwire dashboard. Every number your Twilio account owns is listed here automatically — there's nothing to type in.
Find the number you want to use and click Enable.
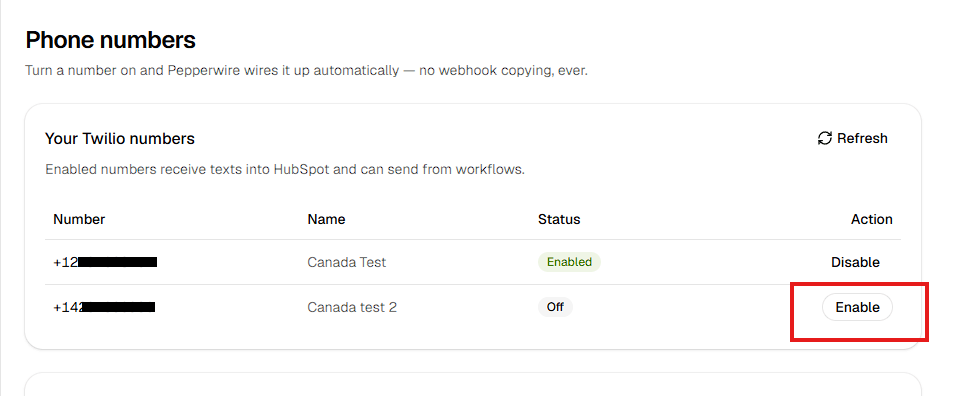
That single click does everything: the number starts accepting incoming texts into HubSpot and becomes available for workflows and contact-record sends. You never have to copy a webhook address into Twilio — a step that trips up most people setting up a Twilio integration by hand.
A few things you might see on this page:
- "No SMS support" next to a number means Twilio says that number can't send text messages. Voice-only numbers show this. Buy an SMS-capable number in Twilio and refresh.
- Nothing listed at all means the connected Twilio account doesn't own a number yet, or your numbers live in a different Twilio subaccount. Buy one in the Twilio Console, or reconnect using that subaccount's credentials.
- Make default appears once you have more than one number enabled. The default is the number that sends when a workflow or the contact-record panel doesn't specify one.
- "Short code · send only" marks a short code — the five- or six-digit senders used for high-volume messaging. They're listed alongside your phone numbers and enable the same way. See below for what they do differently.
If you send from a short code
Short codes appear on this page automatically, just like phone numbers. Turn one on and you can text from it on a contact record, from a workflow, and from the test send — including as your default sender.
One difference: short codes send only. Incoming messages to a short code don't come into HubSpot, and Pepperwire doesn't change how they're routed. A short code is almost always wired to a keyword service that answers HELP and STOP — replies carriers require you to keep working — and taking that over could put your short code out of compliance, so we leave it alone.
If you need two-way texting, use a phone number for that. You can enable both: a short code for sending, and a number for conversations.
To stop using a number, click Disable. Incoming texts to it stop arriving in HubSpot, and messages already logged stay exactly where they are.
Send a test text
Still on the Phone numbers page, scroll to Try it out. Enter your own mobile number and send yourself a message.
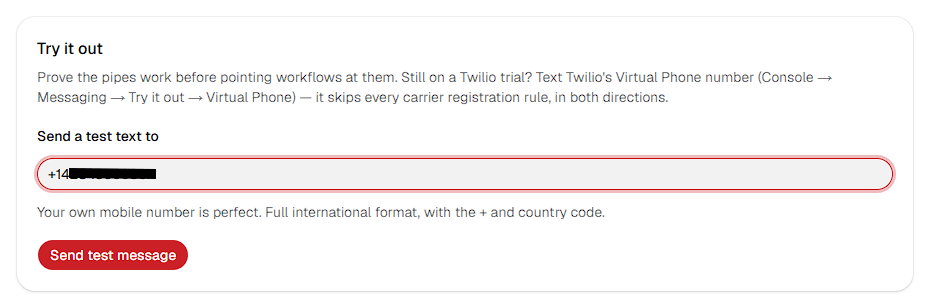
Text back from your phone, and the reply is logged too. That round trip tells you everything downstream will work.
If you're on a Twilio trial account, you can only text numbers you've verified with Twilio, and Twilio prepends a "Sent from your Twilio trial account" notice to every message. To skip both of those, use Twilio's Virtual Phone: in the Twilio Console go to Messaging → Try it out → Virtual Phone. It's a phone number in your browser, and it ignores every carrier registration rule in both directions.
Didn't arrive? Troubleshooting lists every reason a message fails and what to do about each one. The most common by far is missing A2P 10DLC registration.
Text from a contact record
Open any contact in HubSpot. In the right-hand sidebar you'll find a Twilio SMS + Workflows panel.
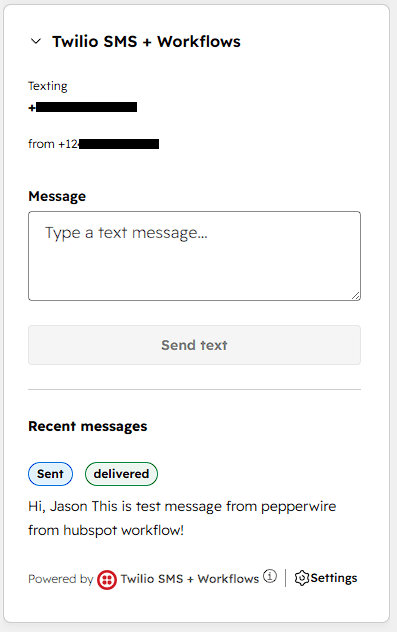
Type your message, choose which of your numbers it should come from if you have more than one, and send. The message and its delivery status appear in the panel, and the message is written to the contact's timeline.
If the contact has no phone number on their record, the panel tells you so rather than failing silently — add a phone number to the contact and reload the page.
Send texts from a workflow
This is the part most teams install the app for. In HubSpot, go to Automation → Workflows, open or create a contact-based workflow, add an action, and choose Send SMS via Pepperwire.
You write the message once, and HubSpot sends it to everyone who enrols in that workflow.
The workflow guide covers this properly: personalization tokens, choosing which contact property holds the phone number, picking the sending number, and reading the action log when something fails.
Put texts in your shared inbox
This step is optional, and worth understanding before you do it.
Without it, everything above still works — you can text from contact records, workflows send messages, and every message is logged on the timeline. What you don't get is a notification when somebody replies.
With it, incoming texts arrive in HubSpot's shared inbox alongside email and chat: unread counts, assignment to a rep, and inline replies. That matters if a team works a queue. It matters less if you work contact by contact.
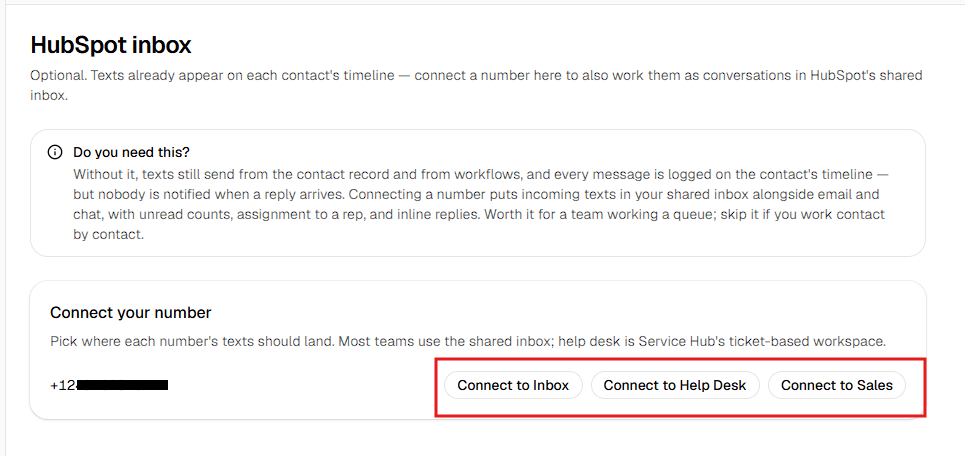
To set it up, go to HubSpot inbox in the Pepperwire dashboard and click Connect next to the number you want to route.
This is the one feature with a hard plan requirement: HubSpot's shared inbox and Help Desk need Sales Hub or Service Hub Professional or Enterprise. If your plan doesn't include it, the page says so plainly and everything else keeps working. The inbox guide covers replying, assigning, and the difference between Inbox and Help Desk.
Where your messages are logged
Two things happen to every message, and it's worth knowing which is which.
Every message is logged on the contact's timeline. Open a contact in HubSpot, look at the activity timeline, and sent and received texts are there in order, alongside emails and calls.
Incoming texts also open a conversation — but only if that number is connected to a HubSpot inbox. If it isn't, the text still arrives and is still logged on the contact's timeline; it just doesn't create a conversation for someone to pick up.
When a text arrives, we look for a contact whose phone number or mobile phone number matches the sender, and the message attaches to them. Texts you send from a contact record or a workflow always land on that contact's timeline, because you already picked the person.
We never create contacts. If a text comes in from a number that matches nobody, that's what happens — nobody gets invented. Where it shows up depends on the number:
- Connected to an inbox: HubSpot opens the conversation anyway, from an unknown visitor. Reply to it, and associate it with a contact whenever you're ready.
- Not connected to an inbox: the text lands on the Messages page of the Pepperwire dashboard, and nowhere in HubSpot. Nothing is lost, but nothing is guessed at either.
You can also see every message, in both directions, with its delivery status on the Messages page of the Pepperwire dashboard. That's the fastest place to check whether something actually left the building.
Your free trial and billing
Your 7-day free trial starts the moment you install. No card is required to start it, and nothing charges automatically when it ends.
When the trial ends without a subscription, sending stops — the contact record panel, workflow actions, and test sends all refuse, and tell you why. Receiving keeps working. Incoming texts are still accepted and still logged, so nothing a customer sends you is lost while you decide.
To subscribe, go to Billing in the dashboard and choose monthly or annual. Checkout is handled by Polar, our payment provider; invoices, card changes, and cancellation all live in their billing portal, reachable from the same page.
Cancelling stops the renewal but keeps everything working until the end of the period you've already paid for.
Disconnect or uninstall
Three different things, with three different consequences. Read the one you actually want.
Disconnect Twilio
In the Pepperwire dashboard, go to Twilio and click Disconnect.
- Your stored API key is deleted from Pepperwire.
- All your numbers are turned off, so texting stops in both directions.
- Your Twilio account itself is untouched — your numbers, your balance, and your message history in Twilio stay exactly as they were.
- Messages already logged on HubSpot timelines stay on those timelines.
You can reconnect at any time with a new API key.
Disconnect a number from your inbox
On the HubSpot inbox page, click Disconnect next to a connected number.
- Incoming texts to that number stop opening conversations in HubSpot.
- The number keeps working everywhere else — workflows and contact-record sends are unaffected.
- Conversations already in your inbox stay there and remain readable.
Uninstall the app from HubSpot
In HubSpot, click the settings gear, then go to Integrations → Connected Apps, find Twilio SMS + Workflows, and choose Uninstall.
Here's exactly what that does:
- HubSpot immediately revokes our access to your account. We can no longer read or write anything in it.
- The contact-record panel and the Send SMS via Pepperwire workflow action disappear. Any workflow still using that action will report the step as failed rather than silently skipping it, so check your active workflows.
- Incoming texts stop reaching HubSpot. Twilio will still receive them on your numbers.
- Nothing already in HubSpot is deleted. Timeline entries, contacts created from incoming texts, and inbox conversations all stay in your account — they're your data, in your CRM.
- Your subscription is not cancelled by uninstalling. Cancel it separately from the Billing page or the payment portal, or email us.
- The message log on our side is kept, so that reinstalling later picks up where you left off. To have it erased, email privacy@pepperwire.app — we delete everything within 30 days and confirm by email.
Our privacy policy sets out in full what we store and for how long.
Get help
Email support@pepperwire.app. A person reads every message, and we reply within one business day.
To get to an answer in one round trip, include:
- Your HubSpot portal ID — it's on the Overview page of the dashboard, and there's a copy button next to it on the Help page.
- What you expected to happen and what happened instead.
- Roughly when it happened. A date and a rough time is enough.
- The phone number involved, if it's about a message that didn't arrive.
Before you write, it's worth a look at troubleshooting — it covers the failures we see most, and about half of them are A2P registration.